


No.36, Fada Road, Taicang, Jiangsu
Views: 0 Author: Site Editor Publish Time: 2026-08-10 Origin: Site


Premium custom camper builds are evolving rapidly across the overlanding industry. Clients now expect seamless automation inside their luxury vehicles. They actively want to move away from physically demanding manual pop-top deployment. However, adding a mechanized roof introduces significant engineering complexities. Upfitters must carefully manage electrical power draw and strict structural integrity. They must also eliminate potential mechanical failure risks. These specific factors become highly critical when travelers camp deep in remote off-grid environments. Today, we will provide a clear, engineering-focused framework for evaluating automated roof systems. You will learn how to select a reliable and highly functional setup. This detailed guide gives builders the exact criteria needed to ensure superior quality and long-term field performance. By mastering these core technical concepts, you can confidently upgrade any van platform. We aim to help you build safer, smarter recreational vehicles.
Transitioning to an automated roof allows for heavier roof loads (solar arrays, gear racks) that manual gas struts cannot safely support.
The choice of vertical lifting mechanism directly impacts interior space, synchronization reliability, and overall roof stability.
A viable electric roof system must include mechanical overrides and integrated fail-safes to protect against power loss or actuator failure.
Successful implementation requires precise structural reinforcement and careful calibration of the lifting controllers to prevent chassis racking.
Builders constantly push the boundaries of modern camper design. Upgrading to a Remote Control RV Poptop Roof solves multiple engineering and ergonomic challenges. Manual systems simply cannot keep up with current off-grid power demands.
Traditional gas struts fail or degrade under heavy weight. They also lose significant pressure in freezing temperatures. Builders today frequently add heavy integrated solar panels. They mount rooftop A/C units and bulky storage boxes. A standard manual strut setup cannot safely lift these components. If you force a manual roof upward with 150 pounds of gear, the struts will eventually collapse. Motorized systems completely eliminate this payload bottleneck. They provide consistent, powerful lifting force regardless of the equipment mounted above.
You must consider the ergonomic benefits for the end-user. Many older travelers struggle with manual deployment. Pushing a heavy fiberglass shell upward requires substantial upper body strength. Pulling it back down against pressurized struts is equally difficult. Automation democratizes the camping experience. It ensures individuals can easily operate the vehicle regardless of physical strength. A simple push of a button replaces intense physical labor. This usability upgrade significantly enhances the daily camping experience.
The recreational vehicle industry is shifting rapidly. The 2025 market trend heavily favors "smart" RV integration. Clients expect digital ecosystems inside their vans. Modern builders sync roof deployment with climate control systems. They wire lifting controllers into centralized touchscreens. Automation is no longer a luxury feature. It is a baseline expectation for high-end custom conversions.
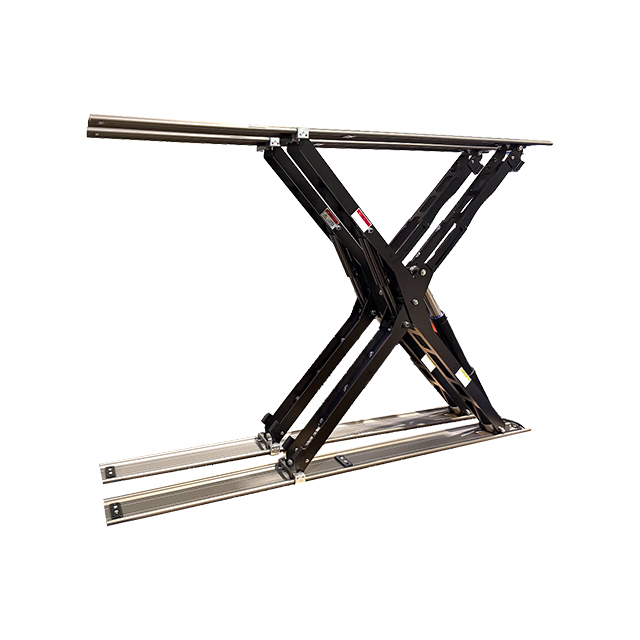
Selecting the correct hardware dictates the success of your roof build. You must evaluate the physical constraints of your chosen van chassis. The right Vertical Lifting Mechanism ensures smooth operation. It also protects the structural integrity of the roof shell.
Linear actuators offer a sleek, modular approach. Builders typically install dual or quad actuator configurations. Dual systems utilize one heavy-duty actuator at the rear or front. Quad systems place one motor at each corner for completely vertical pop-tops.
Synchronization remains the biggest challenge here. You cannot simply supply power to four motors and expect even lifting. Motors naturally run at slightly different speeds. To solve this, premium systems use Hall effect sensors. These sensors count the exact motor revolutions inside each actuator. They report back to a central smart controller. If the left side rises too quickly, the controller slows it down. This prevents the roof shell from binding or twisting.
Scissor lift systems take a completely different mechanical approach. They use central motors connected to crossing steel or aluminum arms. As the motor drives a threaded rod, the scissor geometry expands upward.
We must analyze the inherent trade-offs. Scissor lifts provide excellent lateral stability. They handle high winds exceptionally well because the cross-bracing resists sheer forces. However, they come with notable drawbacks. They increase the overall interior footprint. The bulky metal arms can intrude on mattress space. They also add significant weight to the upper chassis.
You must match the lifting mechanism to your specific project needs. Follow these core guidelines:
Evaluate van chassis length: Short wheelbase vans do well with rear-pivot dual actuators. Long wheelbase vans often require scissor lifts or quad setups to prevent sagging.
Calculate total roof payload: Weigh your solar panels, fans, and roof racks. Add a 20% safety margin before selecting motor torque specs.
Measure available interior space: If headroom is tight, select low-profile linear actuators over bulky scissor arms.
Mechanism Comparison Chart
Feature | Linear Actuators | Motorized Scissor Lifts |
|---|---|---|
Wind Stability | Moderate (Relies on canvas tension) | High (Mechanical cross-bracing) |
Interior Footprint | Minimal (Hidden in corners) | Large (Intrudes on bed area) |
Synchronization Need | High (Requires Hall sensors) | Low (Mechanically linked) |
Weight Overhead | Low to Moderate | Heavy |
Every dependable Electric RV Poptop Roof shares similar foundational technologies. You cannot cut corners on electrical components. The wilderness exposes these systems to extreme environmental stress.
Electrical integration demands careful planning. We generally recommend 12V systems for standard camper builds. A 12V architecture ties seamlessly into your existing house battery bank. It requires fewer step-up converters.
However, 24V architecture is optimal for exceptionally heavy roofs. Running components at 24V significantly lowers the total amp draw. Lower amp draw means you can safely use thinner wire gauges. This reduces wiring weight and minimizes voltage drop over long cable runs. If your client requires a massive solar array, strongly consider a 24V dedicated circuit.
Driving rain and freezing temperatures destroy cheap electronics. Establish a strict baseline requirement for weatherproofing. You must source IP65+ rated motors. The "6" indicates complete protection against dust. The "5" means the unit withstands low-pressure water jets from any direction. Furthermore, all wiring harnesses must utilize sealed, marine-grade connectors. Protect splices with adhesive-lined heat shrink tubing.
Programmable travel limits act as the brain of the operation. Without them, motors will continue pushing until they break something. Limit switches tell the motor exactly when to stop. This prevents dangerous over-extension. Over-extending the roof tears the fabric canvas. It destroys the waterproof gussets. Smart controllers allow builders to set soft-start and soft-stop parameters. This minimizes jarring mechanical shocks during operation.
Safety during transit is paramount. An automated roof must secure itself firmly in the closed position. Highway speeds create immense aerodynamic lift. Without secure locks, the roof shell will bounce. This creates annoying road noise and damages the weather seals. Integrated locking mechanisms pull the roof tight against the chassis. They eliminate wind lift entirely.
Experienced travelers rightly question automated systems. What happens when things break off-grid? You must build robust fail-safes into every installation. Redundancy guarantees safety.
House batteries fail. Inverters shut down. Fuses blow unexpectedly. Outline exactly what happens during total power loss. You cannot leave a client stranded with an open roof. The system absolutely requires a dedicated mechanical override. Some manufacturers use a manual crank port. You simply insert a tool and physically wind the roof down. Others utilize a quick-release pin system. Pulling the pins decouples the actuators, allowing the roof to drop manually.
Clients often ask if the roof will fall if a motor dies. Explain the internal mechanics to ease their worries. High-quality actuators feature built-in mechanical braking. They utilize a worm-gear drive design. This specific gearing holds immense static weight. It physically cannot be back-driven by gravity. If a motor completely burns out while deployed, the internal worm-gear locks in place. The roof stays safely elevated.
Complex digital relays sometimes fail in extreme heat or cold. Remote control fobs get lost or broken. Discuss how to wire a direct-to-battery bypass switch. We highly recommend hiding a simple DPDT (Double Pole Double Throw) rocker switch inside a cabinet. This analog switch bypasses the smart controller entirely. It routes 12V power directly from the battery to the motor leads. It serves as the ultimate "get home" emergency feature.
Proper hardware selection only solves half the problem. Installation execution dictates long-term durability. Poor structural integration will slowly destroy the van chassis.
Cutting the factory sheet metal removes vital structural ribs. You compromise the structural integrity of the entire vehicle. The lifting system must tie into a heavily reinforced perimeter. Discuss the absolute necessity of installing a rigid metal sub-frame. Welding or bolting a steel or thick aluminum frame restores chassis rigidity. Actuators exert hundreds of pounds of localized force. Without a rigid sub-frame, the thin sheet metal will flex, crack, and tear over time.
Mounting actuator brackets directly to thin factory sheet metal.
Failing to seal the new sub-frame against water intrusion.
Ignoring the van's natural curvature when aligning lifting arms.
Moving parts destroy stationary wires. Detail your best practices for routing actuator cables. You must route wires carefully through the canvas folds or along scissor channels. Prevent sharp bends and pinching. Use UV-resistant wire loom for exterior runs. Always create a "service loop" at hinge points. A service loop provides extra cable slack. This prevents copper wire fatigue over thousands of up-and-down cycles.
The initial setup phase requires extreme patience. Outline the calibration process clearly. Emphasize that millimeter-perfect alignment is absolutely required. If one actuator sits slightly off-axis, it will bind. Binding causes uneven wear on internal bearings. It increases the motor's electrical amp draw, eventually blowing fuses. Use laser levels and digital inclinometers to square every component before final tightening.
Automating a camper roof elevates the entire user experience. You eliminate physical strain while unlocking new cargo possibilities. However, success depends on strict engineering discipline.
Let us summarize the shortlisting logic:
Payload requirements always dictate your motor strength.
Chassis size and interior layouts dictate your mechanism style.
Off-grid intent dictates your necessary mechanical fail-safes.
Take action before cutting your van roof. Recommend builders consult closely with structural upfitters. Always request CAD integration files from manufacturers before purchasing any system. Digital modeling ensures exact compatibility with your specific van platform. By following these rigorous standards, you guarantee a safe, reliable, and premium overland vehicle.
A: Yes, retrofitting is possible, but it requires significant labor. You cannot simply swap gas struts for actuators. You must install upgraded structural backing plates to handle the motor torque. You will also need to route new electrical wiring and install an intelligent controller unit.
A: A high-quality dual-actuator system typically pushes between 100 lbs to over 300 lbs. Heavy-duty quad setups or robust scissor lifts can handle even more. Always verify the dynamic load rating with the manufacturer before adding heavy solar arrays.
A: A standard 12V system generally pulls between 10 to 25 amps under load. Because a full deployment cycle only lasts about 60 seconds, the total battery capacity consumed is extremely minimal.
A: They are safe within manufacturer limits, typically up to 30-40 mph depending on the mechanism. Scissor lifts handle wind better than linear actuators. In extreme weather, we always recommend engaging physical locking pins to secure the roof structure.


