


No.36, Fada Road, Taicang, Jiangsu
Views: 0 Author: Site Editor Publish Time: 2026-07-06 Origin: Site


Ignoring a small drip in your camper might seem harmless at first. However, minor water ingress rapidly escalates into severe structural rot, hidden mold, and staggering repair bills. The true cost of delayed action often surprises owners. Water moves quickly through interior layers. You might not see the damage until structural integrity fails entirely.
Many owners blame bad sealant for every leak. We must correct this common misconception. Mechanical stress and hardware failure act as the primary culprits in dynamic roof systems. RV Poptop Roof Leak Prevention requires looking beyond surface caulk. Moving parts shift, bend, and degrade under environmental pressure. If mechanical arms fail, no amount of sealant will keep the water out.
We designed this comprehensive framework to secure your mobile investment. You will learn how to accurately evaluate hardware upgrades. We will guide you through advanced material selections. Finally, you will discover how to establish rigorous maintenance protocols. These steps ensure your cabin stays dry during the harshest weather conditions.
Effective leak prevention requires addressing both dynamic hardware (lifting mechanisms) and static barriers (seals and canvas).
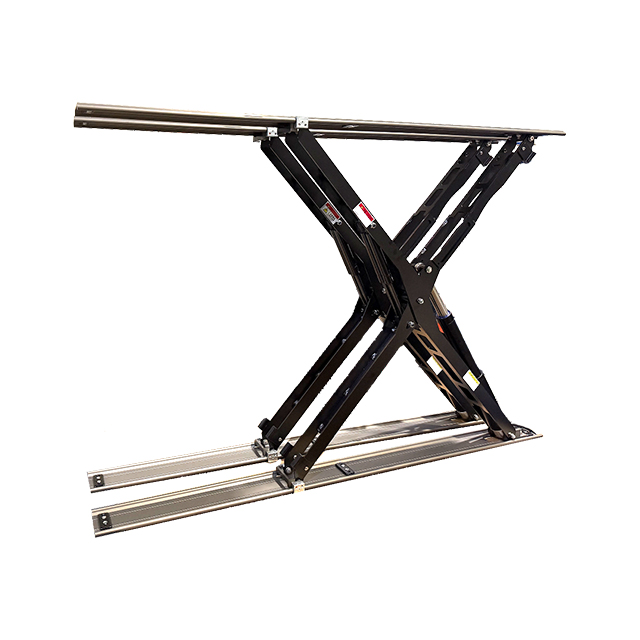
Upgrading to an IP67 waterproof vertical lifting mechanism for RVs eliminates one of the most common, yet overlooked, points of water ingress.
A truly waterproof RV poptop roof relies on a layered defense: high-grade EPDM gaskets, hydrophobic canvas treatments, and proper structural alignment.
Routine, documented inspections (every 3–6 months) are more cost-effective than reactive patching after extreme weather exposure.
Understanding why poptops leak requires separating mechanical failures from material degradation. Standard problem-solving often blends these two distinct issues. Mechanical failure usually involves lifting arms warping over time. High winds or uneven loads bend the metal frames slightly. This warping prevents the roof from closing squarely. Uneven closure creates unequal pressure along the sealing gasket. One side might compress tightly. The other side leaves a microscopic gap. Water easily exploits these gaps during a storm.
Material failure presents a different challenge entirely. UV rays constantly bombard your vehicle. The sun breaks down rubber gaskets over several seasons. They lose their elasticity and become brittle. Canvas materials suffer similar degradation. Factory waterproofing treatments wash away after years of heavy rain. You must identify which failure mode affects your rig before buying repair supplies.
The cost of delay is severe. Secondary damage follows a predictable and destructive timeline. During the first 48 hours, interior insulation saturates completely. Wet insulation loses all thermal resistance. By the end of the first week, mold spores activate inside hidden wall cavities. Prolonged moisture eventually reaches electrical harnesses. This leads to dangerous shorts and dead battery banks. Proactive evaluation prevents these exponential repair costs.
You must monitor three high-risk failure zones closely. The roof-to-body gasket interface represents the largest surface area for potential leaks. The lifting mechanism entry points are highly vulnerable. These metal arms pierce the exterior shell, creating direct pathways for water. Finally, canvas seams stretch and pull during every deployment. Stitched holes expand over time, welcoming moisture inside the cabin.
Standard lifting systems contain severe hardware vulnerabilities. Hinges, struts, and hydraulic arms act as natural channels for rainwater. These metal components constantly shift during deployment. Seals around their mounting points endure immense dynamic load. Rubber gaskets tear and stretch around these moving parts. Water tracks directly down the metal arms into your living space. We see this vulnerability frequently in older campers.
Upgrading your hardware is often the most permanent fix. You should strongly consider installing an IP67 Waterproof Vertical Lifting Mechanism for RVs. The IP67 rating provides an objective standard for environmental protection. The "6" guarantees complete protection against harmful dust ingress. The "7" ensures the mechanism resists water ingress perfectly. This holds true even under pressurized spray or extremely heavy rain.
Specific hardware features deliver concrete outcomes. Sealed actuators form the core of this upgrade. Manufacturers build weather-rated housings around the sensitive mechanical joints. This feature completely eliminates water tracking down the lifting arms. The outcome is a perpetually dry interior cabin. You no longer have to worry about wind-driven rain breaching the mechanical seals.
Retrofitting an existing poptop requires assessing scalability and installation realities. Standard OEM replacements might seem easier initially. However, OEM parts often repeat the same design flaws. They will likely fail again within a few years. An IP67-rated retrofit requires more initial planning. You may need adapter plates or professional alignment. Yet, the return on effort is substantial. Upgraded mechanics permanently close the most notorious leak pathways on your vehicle.
Building a truly Waterproof RV Poptop Roof demands high-performance barrier materials. Gasket evaluation is your first critical step. Many budget campers use standard foam weatherstripping. Foam compresses easily but lacks structural memory. It stays flat after being squashed. We strongly recommend EPDM rubber seals instead. EPDM boasts superior resistance to thermal expansion and contraction. It bounces back to its original shape perfectly. Furthermore, EPDM survives intense UV exposure far longer than typical foam.
Canvas and textile treatments form your second line of defense. Aftermarket hydrophobic coatings fall into two main categories: fluoropolymer and silicone-based sprays. Silicone sprays block water effectively. However, they also trap interior humidity. This creates massive condensation problems inside your sleeping area. Fluoropolymer treatments offer a better solution for poptop side-tents. They repel exterior rain while allowing interior moisture to escape. Always choose breathable treatments for textile sections.
Sealant compatibility remains a frequent stumbling block for many owners. Mixing incompatible chemical bases ruins the waterproof bond. If you apply a polyurethane adhesive over an old silicone barrier, it will fail immediately. You must clean the surface down to bare fiberglass or metal first.
Sealant Type | Best Application Area | Key Advantage | Common Mistake to Avoid |
|---|---|---|---|
Self-Leveling Lap Sealant | Horizontal roof surfaces, vent fans | Flows smoothly into micro-cracks | Applying on vertical surfaces (it will drip) |
Polyurethane Adhesive | Mechanical mounting points, hinges | Extreme bond strength, highly flexible | Using over old silicone residue |
Butyl Tape | Underneath mounting flanges | Never fully hardens, moves with vibration | Leaving edges exposed to direct UV light |
Review the matrix above before purchasing chemical sealants. Always match the compound to the specific physical orientation of the leak. Proper material selection prevents frustrating re-work.
Repairing a leak carries significant implementation risks. The "trapped moisture" risk destroys many well-intentioned repair jobs. You must never apply new sealants over damp materials. Waterproof coatings lock existing moisture inside the structural wood or insulation. This trapped water accelerates internal rot drastically. It feeds mold colonies hidden behind your interior panels. Always ensure the targeted area is completely dry. Use industrial fans or dehumidifiers for at least 48 hours before applying any chemicals.
Finding the exact entry point requires patience. We recommend using a controlled testing protocol. Do not blast your camper with a high-pressure power washer. High pressure easily forces water past perfectly good seals, causing artificial leaks. Instead, follow a low-pressure hose test.
Wait for a completely dry, sunny afternoon to ensure baseline dryness.
Station one person inside the cabin with a bright flashlight.
Use a standard garden hose set to a gentle shower spray.
Start spraying at the lowest point of the poptop system.
Isolate one small quadrant at a time, spraying continuously for ten minutes.
Have the interior person document any micro-leaks or damp spots immediately.
Move upward slowly only after confirming the lower section is watertight.
A proactive maintenance cadence saves considerable time. Establish a strict six-month inspection baseline. Focus your inspection on three key areas. First, check mechanical alignment. Ensure the roof closes evenly on all four corners. Second, test gasket elasticity. Press your thumb into the EPDM rubber. It should rebound instantly without showing surface cracks. Third, examine canvas seam integrity. Look for stretched stitching holes or fraying threads along the tension points.
Owners face tough choices when mitigating water damage. Effective RV Poptop Roof Leak Prevention often boils down to choosing the right intervention level. You need a clear decision framework to decide between DIY patching and professional retrofits. Evaluate the severity of the problem honestly.
Minor seam weeping usually justifies a DIY approach. If a canvas thread leaks slightly during a downpour, you can handle it. Apply a high-quality seam sealer or a breathable fluoropolymer coating yourself. However, mechanical failures demand professional intervention. If you notice uneven roof closure, you have a structural problem. If you spot thick rust on your lifting actuators, surface sprays will fail. These scenarios require a professional mechanical upgrade to restore proper sealing pressure.
If you pursue replacement parts, you must evaluate vendors strictly. The market floods easily with cheap, non-rated hardware. Use the following criteria when sourcing critical components:
Clear Warranty Terms: Look for vendors offering multi-year guarantees on mechanical joints and seals.
Verified IP Ratings: Demand independent documentation proving the IP67 status of mechanical lifting parts.
Documented Material Lifespans: Ask for UV-resistance testing data on any EPDM gaskets or rubberized housings.
Retrofit Support: Choose manufacturers who provide specific adapter kits and alignment guides for your vehicle model.
Selecting the right vendor prevents buying a temporary bandage. High-quality parts ensure your repair efforts last for the entire lifespan of your camper.
Long-term leak prevention is a calculated combination of robust mechanical hardware and high-quality synthetic seals. You cannot fix a twisted lifting arm with a tube of silicone. Start your repair journey by evaluating the current lifting mechanism. This mechanical audit remains the crucial first step before you invest heavily in temporary surface coatings or new canvas.
We urge you to take proactive steps immediately. Conduct a controlled, low-pressure water test this weekend to find hidden vulnerabilities. Audit your lifting hardware to see if it meets modern IP-rated compliance standards. Upgrading your moving parts and switching to EPDM gaskets will permanently secure your cabin against the worst weather.
A: We recommend conducting thorough baseline checks every six months. Additionally, you should perform brief visual inspections immediately after heavy storms, severe temperature drops, or extensive off-road use. Dust, vibrations, and UV rays degrade rubber quickly. Catching a dry-rotted gasket early prevents extensive interior water damage later.
A: No. Coatings are strictly preventative measures, not structural fixes. If water already enters the cabin, a root cause exists beneath the surface. You must address mechanical misalignments, torn gaskets, or broken sealant bonds first. Only apply waterproof coatings after repairing the underlying structural breach.
A: Yes. Standard mechanisms frequently allow water ingress under wind-driven rain or heavy snowmelt. Exposed hinges and unsealed struts act as metal bridges, channeling water past the outer gaskets. This highlights the absolute necessity of upgrading to an IP-rated lifting system for all-weather camping.
A: Dry the interior surface as best as possible with towels. Apply specialized waterproof butyl tape or emergency RV patch tape directly over the ingress point from the inside. This provides actionable, temporary mitigation. You must pursue a permanent mechanical or seal fix once the weather clears.


