


No.36, Fada Road, Taicang, Jiangsu
Views: 0 Author: Site Editor Publish Time: 2026-07-15 Origin: Site


Cutting the roof off a VW T6 ranks as the highest-risk phase of any camper build. This irreversible step permanently alters the vehicle structurally. It also represents the highest-cost single item in the conversion process. You transition from a standard panel van to a fully functional camper. This process requires delicate compromises. You must balance generous interior headroom against aerodynamic drag. Payload limits and structural safety also demand strict attention. Choosing the wrong setup leads to persistent leaks, wind noise, and structural fatigue.
Our goal is to provide a rigorous, evidence-based evaluation. We examine fitment protocols, thermal realities, and long-term implementation risks. You will learn how to navigate material specifications safely. We also highlight critical ways to avoid structural pitfalls. This guide helps owners and professional converters confidently finalize their ideal roof system selection.
Structural Compliance: Installing a Volkswagen T6 Pop-Up Roof requires a dedicated, safety-tested strengthening frame to replace the factory cross-members.
Thermal Management: Standard canvas offers minimal thermal retention; four-season usability requires upgrading to marine-grade acrylics, insulated wraps, or specialized bi-layer fabrics.
Payload Constraints: A complete roof system adds 60kg–90kg; factoring in roof racks and solar panels is critical for maintaining safe gross vehicle weight (GVW).
Vendor Selection: Warranty length, hinge durability (scissor lift capacity), and TÜV (or regional equivalent) certification are non-negotiable evaluation criteria.
Factory vans utilize thick steel cross-members spanning the roof interior. These ribs tie the vehicle's pillars together, maintaining rigid crash safety. Removing them to create an access hole compromises the entire shell. You must install a dedicated strengthening frame to combat this structural shift. This heavy-duty reinforcement contour bonds directly to the remaining roof perimeter. It acts as the new structural spine. Without it, the van chassis will twist during tight cornering. This twisting causes doors to misalign and windshields to crack over time. We always recommend choosing a frame verified by official crash testing.
Short Wheelbase (SWB) and Long Wheelbase (LWB) models demand different approaches. SWB models feature a tighter, more rigid roof span. The reinforcement frame fits neatly between the factory pillar points. LWB models present a tougher engineering challenge. They have an extended unsupported middle section. This requires a thicker, more robust strengthening frame to prevent mid-chassis sag. The hinge placements also differ drastically. LWB roofs require the rear hinges mounted further back. This precise placement ensures the longer fiberglass shell lifts evenly without stressing the front latches.
When installing a Volkswagen T6 Pop-Up Roof, meticulous structural preparation dictates the overall longevity of your camper. Preparing the van before cutting the metal dictates the success of the installation. We use a strict sequence to avoid irreversible mistakes. You must finalize these preparations before applying the bonding adhesive.
Wiring harness routing: You must map out electrical paths for ceiling lights, solar panel cables, and USB ports. Run these wires through the side pillars before the strengthening frame permanently blocks access to the cavities.
Cab headlining modification: The factory cab roof lining requires precise cutting to match the new opening. You need specific finishing trims to hide the raw edges. Install these trims early to guarantee a factory-clean transition between the cab and the living space.
Rust-proofing bare metal: The cutting process leaves exposed bare steel along the entire roof perimeter. You must file these edges smooth to prevent canvas snags. Apply heavy coats of zinc-based primers immediately. This crucial step prevents long-term oxidation and rust degradation under the hidden canvas.
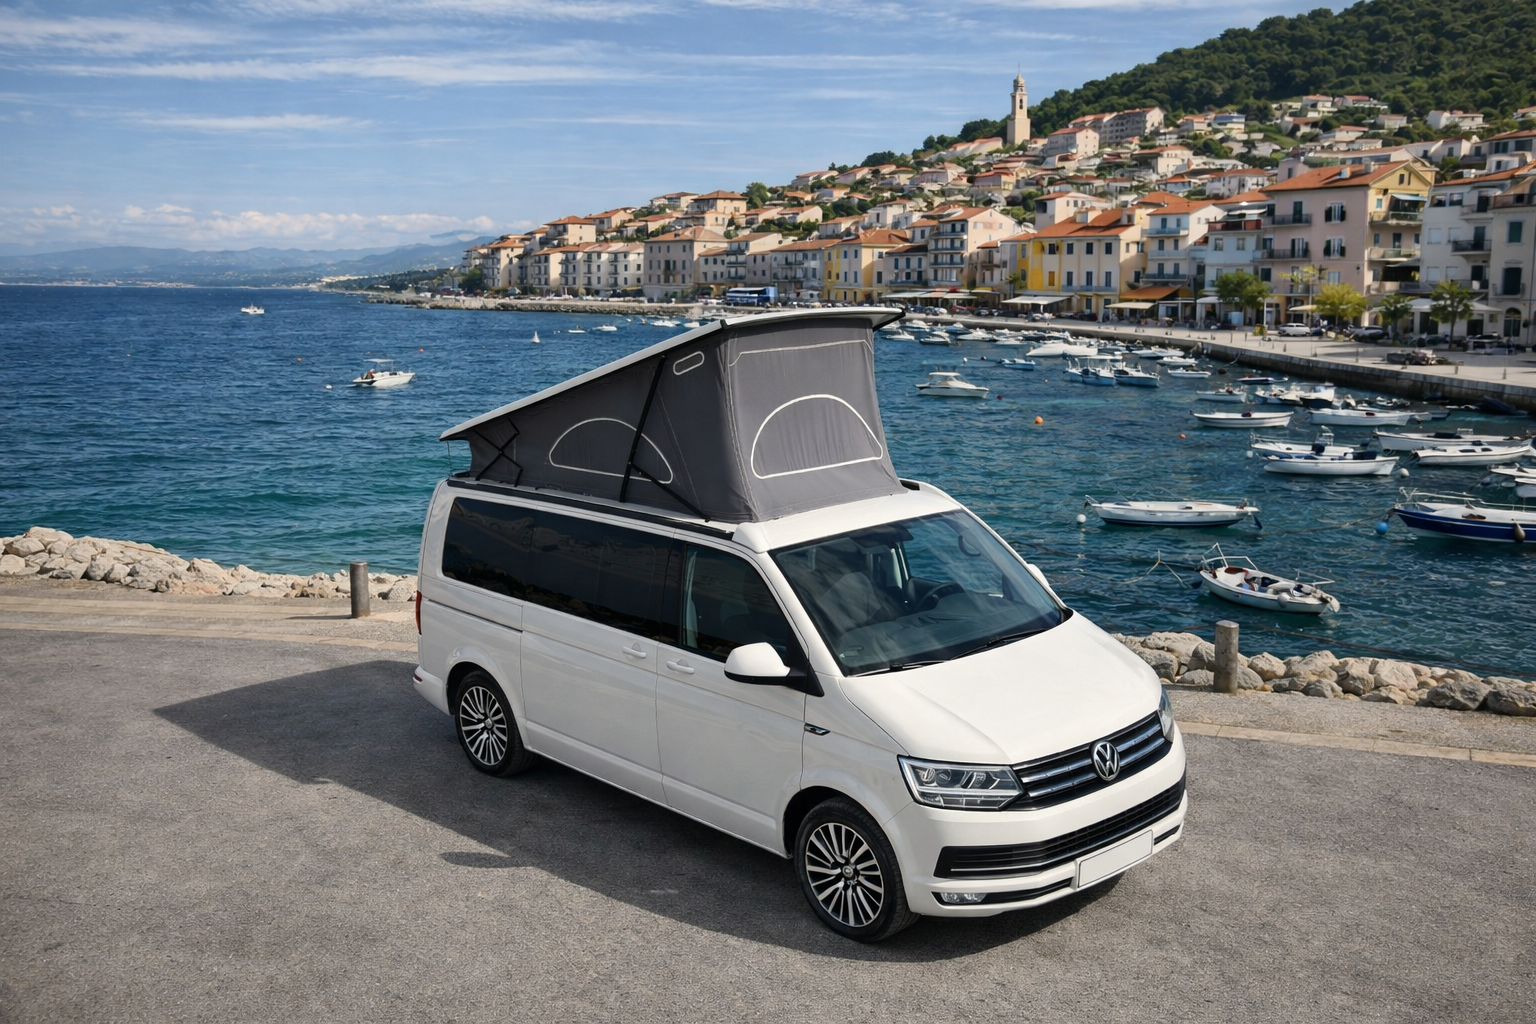
Choosing the right Volkswagen T6 Camper Van Pop-Up Roof System involves comparing how the shell sits on the vehicle. Profile types determine your vehicle's final height and your interior sleeping comfort. Ultra-Low Profile roofs sit flush against the van. They offer minimal wind noise and superb aesthetic integration. You can easily drive into height-restricted parking garages. However, they drastically reduce mattress clearance when closed. Standard Profile roofs sit slightly higher. This extra height allows you to store thicker memory foam mattresses inside the closed roof. You can also install heavy-duty sleeping bases, such as Froli spring systems.
Profile Feature | Ultra-Low Profile | Standard Profile |
|---|---|---|
Visual Integration | Flush fit, nearly invisible from the ground. | Visible raised lip along the van perimeter. |
Wind Noise | Exceptionally low at highway speeds. | Moderate; requires good rubber deflector strips. |
Closed Storage | Fits only thin, 1-inch foam mattresses. | Accommodates thick memory foam and bedding. |
Height Restrictions | Usually passes under 2.0-meter barriers. | Often exceeds 2.0-meter barriers. |
Gas strut load capacities dictate how easily the roof elevates. A standard roof features basic rear hinges. These pivot from a fixed point, creating a tight wedge shape at the back of the bed. High-lift rear scissor hinges solve this problem. They push the rear of the roof vertically before pivoting upward. This design provides significantly more foot-space for sleeping. It completely transforms the upper bed usability for taller adults.
Closure systems require close inspection during your evaluation. Traditional pull-down straps remain common on budget builds. You pull the roof down manually and strap it to metal D-rings. Unfortunately, these straps increase the risk of trapping the canvas in the latch mechanism, which leads to fabric tears. Modern mechanical latch systems offer a superior alternative. They pull the roof shell down flush and lock firmly into place with a steel catch. This modern approach practically eliminates highway wind-lift and creates a watertight seal.
Every reliable RV Poptop Roof requires high-grade material selection. Canvas materials dictate your comfort in changing weather conditions. Cotton and polyester blends serve as the industry standard for entry-level roofs. They offer excellent breathability, which helps minimize internal condensation during the night. However, they require thorough and frequent waterproofing treatments. If you stow a cotton-blend roof while it remains wet, it becomes highly prone to rapid mold and mildew growth.
Marine-grade acrylic presents a premium upgrade for serious campers. Often referred to as "scenic canvas," this heavy-duty material boasts high UV resistance. It remains completely waterproof without constant chemical retreatment. Acrylic is also much easier to wipe clean after muddy camping trips. It does not stretch or sag when exposed to heavy rain.
You must implement robust thermal mitigation strategies if you plan to camp year-round. Single-layer canvas has strict physical limits in sub-zero temperatures. Cold air easily penetrates the thin fabric. You cannot rely on standard canvas for winter camping because heat rises and escapes rapidly through the roof area.
Internal thermal covers (Poptop wraps): You can attach heavy-duty insulated wraps inside the canvas. These quilted covers trap a thick layer of dead air between the fabric and the interior. This significantly slows heat loss and keeps the sleeping area warm.
Silver-screen inserts: Foil-backed thermal screens reflect internal heat back into the van. They also block intense summer sun from baking the upper sleeping area, making them vital for summer travel.
Roof base insulation: The bare fiberglass shell acts as a massive cold bridge. Lining the internal fiberglass roof with closed-cell foam and automotive carpet controls condensation. It stops warm human breath from condensing into water droplets and dripping onto your mattress.
Water ingress remains the biggest long-term threat to any camper conversion. You must maintain proper drainage to protect your interior. The factory roof gutters channel rainwater away from the doors. When installing the strengthening frame, inexperienced fitters often fill these gutters with excessive bonding adhesive. Proper technique requires clearing the drain paths meticulously. Installers must seal the strengthening frame perfectly. If tiny gaps exist, capillary action pulls standing rainwater directly into the headliner, causing severe water damage.
Wind noise and aerodynamics need immediate attention post-installation. The transition gap above the windshield catches the wind at highway speeds. A poorly fitted roof acts like a parachute, straining the front latches. Installers manage this aerodynamic drag by fitting thick rubber deflector strips. These front spoilers smooth the airflow over the leading edge of the fiberglass shell, ensuring a quiet ride.
Adding accessories changes the physical load limits of the roof. Calculate the maximum capacity for roof bars and roof boxes carefully before drilling into the shell.
Accessory Type | Estimated Weight | Gas Strut Requirement | Safety Note |
|---|---|---|---|
Flexible Solar Panel | 3kg - 5kg | Standard Struts | Negligible impact on lifting mechanism. |
Rigid Solar Panel | 10kg - 15kg | Upgraded Struts (e.g., 450N to 500N) | Requires careful wire routing through the canvas. |
Empty Roof Box / Bars | 15kg - 25kg | Heavy-Duty Struts | Check maximum dynamic load for highway driving. |
Loaded Box / Kayak | 30kg - 50kg+ | Do Not Elevate | Must remove heavy gear before unlatching the roof. |
Upgrading gas struts is mandatory for permanent accessories. If you bond rigid solar panels to the shell, the roof becomes permanently heavier. Factory gas struts will fail to hold the roof open, causing it to sag or collapse on the occupants. You must install high-pressure struts to safely accommodate this new static weight.
Finally, DIY cutting carries enormous warranty voidance risks. Altering the van's structural integrity without certified documentation severely impacts your vehicle insurance. Many insurers outright refuse coverage for undocumented structural modifications. Your residual resale value plummets if you cannot prove a certified fitter handled the frame bonding. Always insist on TÜV certification or your regional equivalent to maintain legal compliance.
Choosing the correct roof system depends heavily on your intended use. A basic standard-profile roof with cotton-blend canvas suits weekend summer trips perfectly. Conversely, full-time all-season living demands marine-grade acrylic, scissor hinges, and comprehensive thermal wrapping. You must align your material choices with your actual travel seasons and storage capabilities.
We highly recommend consulting with certified fitters before purchasing any materials. You need to confirm lead times and exact model compatibility. For example, rear HVAC placement in specific T6 models heavily impacts where you can safely cut the roof steel. Always secure a fixed quote covering both the parts supply and the structural installation to avoid unexpected expenses down the road.
A: Yes. The T6 and T6.1 share the exact same core roof structure and chassis dimensions. The differences between these models exist mainly in the front dashboard, cab electronics, and steering systems. Installers use the same structural reinforcement frames and canvas profiles for both iterations without needing specialized modifications.
A: A complete roof system typically adds between 60kg and 90kg to your van. This weight includes the fiberglass shell, strengthening frame, canvas, and internal bed board. You must deduct this directly from your vehicle’s allowable payload to ensure you do not exceed the legal gross vehicle weight.
A: Generally, no. Most standard gas struts cannot lift or sustain the combined weight of the fiberglass shell and a loaded roof box. Heavy accessories can cause the roof to collapse unexpectedly. You must un-weight the roof bars before lifting, or upgrade to high-pressure heavy-duty gas struts rated for the specific load.
A: A standard canvas features fixed fabric with small mesh windows for basic ventilation. A scenic canvas includes a heavy-duty zipper running along the perimeter of the tent. This zip-out function allows you to completely open the canvas, providing a full panoramic view and maximizing airflow during hot summer days.


