No.36, Fada Road, Taicang, Jiangsu
Views: 0 Author: Site Editor Publish Time: 2026-05-31 Origin: Site


Transitioning an RV poptop roof from manual or gas-strut operation to a fully automated electric system introduces strict mechanical and electrical dependencies. Upgrading a camper requires more than just installing a basic motor. You must engineer a resilient power foundation capable of managing dynamic forces. Adding solar arrays, roof racks, and climate control pushes roof weights to 150–400 lbs. Lifting this unevenly distributed load requires precise engineering. Without it, you risk severe structural binding, motor burnout, or even chassis distortion over time. This guide breaks down the architectural decision between 12V and 24V electrical frameworks. We will evaluate load capacities, wiring efficiencies, and the critical role of motor synchronization. You will learn how to design reliable mechanisms for high-end pop-top conversions and OEM builds.
The primary failure mode of motorized pop-tops is uneven lifting due to asymmetric weight distribution; synchronization controllers are mandatory for strokes over 18 inches.
A 12V RV Poptop Roof architecture simplifies component sourcing and appliance integration but requires significantly thicker, stiffer cabling for high-torque lifts.
A 24V RV Poptop Roof system halves the amperage, reducing cable costs and installation friction, but introduces 5–8% efficiency losses via DC-DC step-down converters for legacy 12V appliances.
Procurement evaluation must prioritize IP67 waterproofing, Hall-effect sensor feedback, and manual emergency override capabilities.
Most camper roofs do not carry weight evenly across their surface. Front-mounted solar panels or rear-mounted air conditioning units cause linear actuators to experience varying resistance. When you deploy a fully loaded RV Poptop Roof, gravity pulls harder on the heavier sections. This creates a severe asymmetric load problem.
Without active intervention, motors bearing heavier loads run significantly slower. This speed variance twists the rigid pop-top structure. It inevitably leads to snapped pivot brackets, damaged weather seals, or complete mechanical binding. A twisted roof frame often allows water ingress during heavy rain. Repairing a bound mechanism in the field is nearly impossible without specialized lifting gear.
Actuators operating at 90–100% of their maximum load threshold suffer rapid thermal degradation. Standard engineering practice dictates sizing actuators properly. You should design them to operate at 50–70% capacity. This safety margin ensures longevity under wind resistance and dynamic friction.
Follow these core steps to calculate your required load capacity:
Weigh the bare fiberglass or aluminum roof shell accurately.
Add the exact weight of all accessories, including solar panels, crossbars, and fans.
Factor in dynamic resistance forces, such as canvas tension and hinges.
Multiply the total combined weight by a 1.5 safety factor to determine your minimum actuator thrust requirement.
Always position heavy items like air conditioners as close to the hinge pivot (for wedge-style roofs) or directly over the strongest lift columns. This reduces the cantilever effect and minimizes actuator strain.
12V remains the legacy standard for automotive and RV electrical systems. A 12V RV Poptop Roof integrates natively into most standard van builds. You can connect standard water pumps, vent fans, and LED lighting directly to the battery bank. You do not need secondary voltage converters. This keeps the electrical diagram remarkably straightforward.
These systems excel in specific environments. They are best suited for lightweight roofs under 150 lbs. They work perfectly for short-stroke lifts under 12 inches. You should use a 12V architecture when your total inverter load remains under 3000W. They also make sense if your solar capacity stays below 1450W. For basic weekend campers, 12V provides an easy, reliable ecosystem.
Despite its simplicity, a 12V setup introduces physical challenges during installation.
Voltage Drop: High-torque 12V motors pull significant amps under load. Long wire runs from the battery bank to the roof require heavy-gauge cables. You might need rigid 4/0 AWG copper wire. These massive cables are expensive and incredibly difficult to bend around vehicle corners. They also require specialized hydraulic crimping tools.
Component Heat: Higher current yields higher operating temperatures. Terminal junctions become vulnerable heat points. If you do not seat your connections perfectly, you risk thermal runaway and melted fuse blocks.
Slower Cycle Times: Severe voltage drop across a long 12V wire run can noticeably slow down actuator speed during the final inches of deployment.
Doubling the operating voltage to 24V cuts the required current in half. A 120A pull at 12V becomes a highly manageable 60A pull at 24V. This fundamental shift allows builders to step down from rigid 4/0 AWG cables. You can safely use much thinner 2/0 AWG wiring. Upgrading to a 24V RV Poptop Roof system reduces installation friction considerably.
A 24V architecture becomes mandatory for expedition vehicles. It is essential for 4-point heavy-duty lift systems supporting over 200 lbs of gear. If you build rigs running robust external BMS networks (like Victron setups), 24V is ideal. Large AC inverter demands require higher voltage to prevent rapid battery depletion and excessive heat generation.
High-voltage systems are not perfect. They present specific challenges you must plan for.
Thermal Losses: You cannot run legacy 12V vent fans or lights directly off a 24V battery bank. You must use 24V to 12V DC-DC step-down converters. These devices operate at roughly 92-95% efficiency. The remaining 5-8% converts directly into heat. This creates continuous thermal energy loss whenever a 12V appliance runs.
Ventilation Needs: Because step-down converters generate heat, you must install them in well-ventilated compartments. Stashing them in a sealed wooden cabinet will cause premature failure.
Cost Realities: The money you save by buying thinner copper wire frequently offsets itself. Premium 24V components and industrial DC-DC converters carry a high initial price tag.
Feature Matrix | 12V Architecture | 24V Architecture |
|---|---|---|
Wire Gauge Required | Thick (4/0 AWG) | Manageable (2/0 AWG) |
Amperage Draw | High (e.g., 120A) | Low (e.g., 60A) |
DC-DC Converter Needed? | No (Native integration) | Yes (For 12V appliances) |
Ideal Application | Lightweight, basic campers | Heavy-duty, expedition rigs |
Whether you select a 12V or 24V system, multi-actuator setups demand active management. Voltage alone does not maintain a level ascent. Multi-point lifts face uneven friction and unequal weight distribution.
Commercial-grade actuators feature built-in Hall-effect sensors. These tiny magnetic sensors count motor rotations precisely. The synchronization controller reads these electronic pulses in milliseconds. It tracks the exact physical stroke position of every actuator simultaneously.
If the heavier side of the roof begins to lag, the controller acts instantly. It throttles the voltage sent to the lighter side. By slowing down the fast actuator, the system allows the burdened actuator to catch up. This active speed modulation ensures all mounting points rise together within a strict ±0.1-inch tolerance. You avoid twisting the frame entirely.
High-end control boards retain position data after you turn the power off. This feature prevents "zero drift." Zero drift occurs when minor motor slippage accumulates over months of use. Without memory retention, the roof slowly becomes unlevel. Eventually, it fails to close tight against the weather seals. Advanced controllers memorize the absolute bottom and absolute top stroke limits permanently.
Do not attempt to wire two linear actuators in parallel directly to a basic rocker switch. Parallel wiring guarantees uneven deployment. One motor will always draw slightly more current than the other, causing a catastrophic binding event.
Choosing the right hardware dictates the lifespan of your camper roof. Hardware failures in remote locations ruin expeditions. You must evaluate suppliers based on strict mechanical criteria.
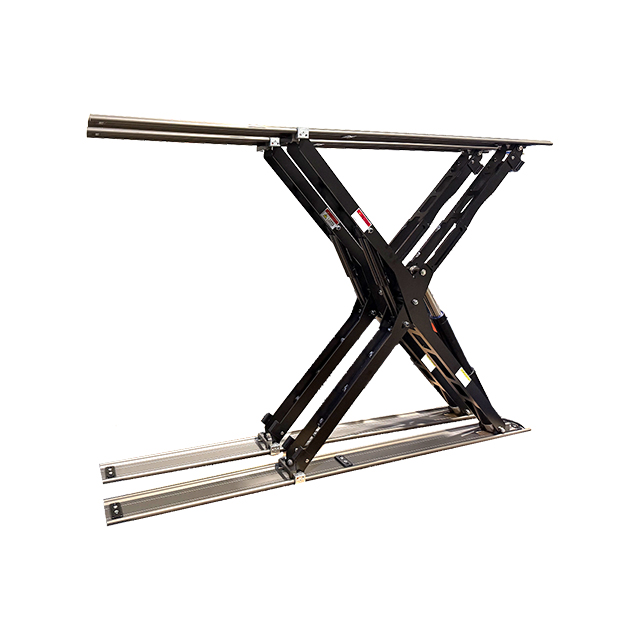
Always specify pivot mounts over fixed brackets. A poptop roof travels in a slight geometric arc during deployment. It does not go perfectly straight up. Fixed brackets restrict this natural arc. They introduce severe side-loading forces on the actuator shaft. This side-loading destroys internal O-rings and bearings rapidly. Pivot brackets allow the actuator body to rotate freely throughout the stroke.
Your lift mechanism faces brutal weather conditions. Look for IP66 or IP67 ratings. The system must withstand highway-speed rain driving moisture into the gear casing. Furthermore, the mechanism must reliably deploy and hold structural integrity against 50mph (80km/h) wind shears. Wind creates a massive sail effect against an open canvas tent.
Evaluation Parameter | Minimum Acceptable Standard |
|---|---|
Lifecycle Testing | ≥10,000 continuous lift cycles under load. |
Water Ingress | IP66/IP67 rated gear housings. |
Acoustics | Below 50dB operating noise level. |
Failsafe | Mechanical override or bleed valve present. |
Catastrophic electrical failures happen. Batteries die, and fuses blow. The system must include a mechanical manual-override. Electric actuators need a manual crank slot. Hydraulic variants require an emergency pressure release valve. This redundancy allows you to lower the roof manually so you can safely drive home.
Choosing between 12V and 24V dictates your entire build strategy. Choose a 12V architecture to maintain a simplified, single-voltage ecosystem. It works perfectly for lighter, standard-use campers without massive power demands. Opt for a 24V architecture if you are designing a heavy-duty, off-grid platform. When mitigating high amperage and wrestling with thick wire gauges becomes a bottleneck, 24V offers the cleanest solution.
Before purchasing hardware, take action on your math. Physically weigh the fully loaded roof, including solar panels, racks, and internal headliners. Calculate the necessary 30% safety redundancy. Select pivot brackets to protect your motors, and never skip the synchronization controller. Proper planning ensures your poptop deploys flawlessly for decades.
A: Yes, for any 4-point lift or 2-point lift exceeding an 18-inch stroke. Without synchronization, asymmetrical roof loads will cause the lift mechanisms to bind and potentially bend the frame.
A: Not inherently. Actuator speed is determined by the motor's gearing and lead screw pitch, not just voltage. However, 24V systems experience less voltage drop over long wire runs, leading to more consistent performance under heavy strain.
A: Evaluation-grade lifting mechanisms include a mechanical bypass. You must ensure the selected system allows for manual release of the gears or hydraulic pressure to safely close the roof for travel.
A: Yes, by using a dedicated 12V to 24V step-up converter to power the roof controller. Though this adds a potential point of failure and slight efficiency loss, it works. It is generally recommended to match the lift voltage to the primary house battery bank.


