


No.36, Fada Road, Taicang, Jiangsu
Views: 0 Author: Site Editor Publish Time: 2026-07-20 Origin: Site


You have moved past the initial inspiration phase of campervan life. Now, you are actively evaluating the feasibility, costs, and risks. Modifying your daily driver requires serious consideration. Cutting into your Multi-Purpose Vehicle (MPV) remains a major commitment.
A pop-top modification is the most expensive and structurally invasive change in any camper conversion. Making the wrong choice directly impacts passenger safety. It alters your vehicle's payload limits. It also complicates off-grid solar power capabilities. You need facts before making this structural change.
This guide provides a rigorous, evidence-based evaluation framework. We cover structural realities, payload constraints, solar integration, and conversion ROI. You will gain the exact knowledge needed. This framework helps you confidently shortlist products and certified installation partners.
Structural integrity is paramount: Installing an MPV RV poptop roof requires removing a significant roof section; a certified reinforcement frame is non-negotiable for passenger safety and compliance.
Payload penalties are real: A standard pop-top system adds 150–200 lbs to the vehicle's highest point, affecting center of gravity and total payload capacity.
Solar capacity requires specialized planning: Roof strut weight limits dictate whether you can install rigid or flexible solar panels without compromising the lifting mechanism.
Professional installation mitigates long-term costs: DIY installations carry high risks of water ingress and canvas degradation, making certified installers a safer long-term investment.
Cutting away the factory steel removes vital structural cross-members. These metal ribs naturally prevent your chassis from twisting during cornering. Removing them instantly compromises the torsional rigidity of the vehicle. You must replace this lost strength.
Installers achieve this by welding or bolting in a dedicated strengthening frame. You must insist on integrated steel or aluminum reinforcement frames. Look for TÜV-approved systems or local compliance equivalents. These tested frames ensure your modified MPV survives crash scenarios. Passenger safety relies entirely on this hidden structure.
Major structural modifications directly impact factory warranties. Dealerships often void the bodywork warranty once the roof is cut. You need post-installation certification. A certified engineer must sign off on the reinforcement work. This documentation ensures the vehicle remains legally compliant. Without it, you cannot legally insure the camper.
You also face changes in aerodynamics and road noise. Adding a bulky top increases aerodynamic drag. You will hear more wind whistling at highway speeds. Low-profile fiberglass shells mitigate this issue significantly. They offer better stealth aesthetics. However, a sleek profile requires a trade-off. You lose interior clearance. This limits the thickness of the mattress you can store upstairs.
Choosing an integrated MPV RV Poptop Roof requires balancing structural safety against aesthetic desires. Prioritize the reinforcement frame over exterior looks. Your safety depends on it.
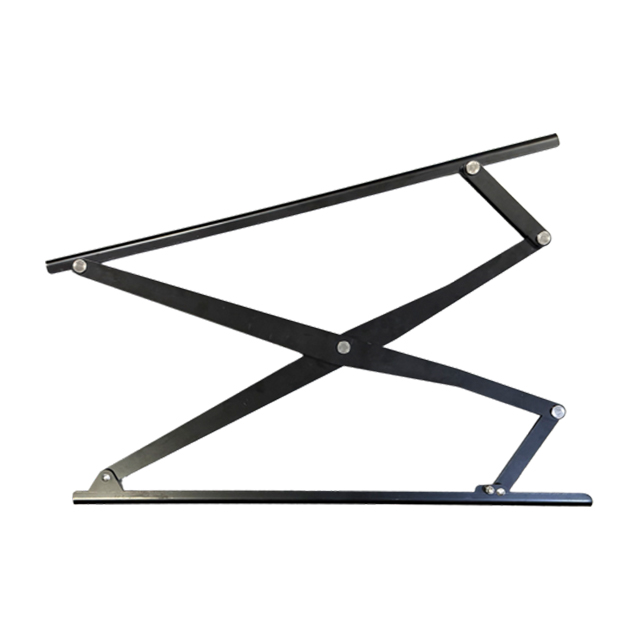
Understanding weight limits prevents dangerous overloading. You must differentiate between dynamic and static weight capacities. Dynamic limits dictate what the roof can support while driving. This usually maxes out around 110 lbs. Static limits indicate how much weight the elevated roof can hold when parked.
Weight Category | Definition | Standard Capacity Limit |
|---|---|---|
Dynamic Weight | Maximum load safely carried while the vehicle is in motion. | Approx. 110 lbs (50 kg) |
Static Weight | Maximum load supported while parked and elevated. | Approx. 440 lbs (200 kg) |
Adding a complete system penalizes your overall payload. A typical installation adds 150 to 200 lbs to the highest point of your van. This dramatically alters the center of gravity. Your MPV will handle differently on winding roads. You must calculate your remaining payload carefully. Deduct the new roof weight from the Gross Vehicle Weight Rating (GVWR). The remainder dictates how much cabinetry, water, and passenger weight you can legally carry.
You must evaluate the true utility of the newly created space. Every RV Poptop Roof uses specific lifting hinges. Scissor-hinge designs elevate the rear section higher. They offer superior foot room for sleeping adults. Standard rear-hinge models pinch tightly at the back. They restrict foot space severely.
Maximizing standing room often limits mattress thickness. High-lifting hinges allow comfortable cooking inside. However, the closing mechanism requires a slim profile. You will likely sleep on a thin, firm mattress to allow the shell to latch properly.
Adding solar power introduces hidden mechanical challenges. Manufacturers calibrate the lifting gas struts for the exact weight of the bare fiberglass shell. Bolting panels onto the shell disrupts this calibration. The extra weight prevents the roof from staying up. The shell might collapse under load.
You must upgrade the gas struts if you install solar. Upgraded struts handle the additional 20 to 40 lbs smoothly. You face a choice between rigid and flexible panel technologies.
Panel Type | Advantages | Disadvantages |
|---|---|---|
Rigid Panels | Better airflow underneath, higher efficiency, longer lifespan. | Heavier, increases aerodynamic drag, requires drilling brackets. |
Flexible Panels | Lightweight, low-profile stealth look, follows shell curves. | Prone to micro-cracking during shell flex, inferior heat dissipation. |
Rigid panels offer superior cooling and efficiency. They sit slightly elevated on brackets. This allows air to flow beneath them. However, they add significant drag. Flexible panels maintain a sleek aesthetic. They tape directly to the fiberglass. Unfortunately, the shell flexes slightly during opening and closing. This flexing causes micro-cracks in flexible cells over time.
Cable routing requires meticulous planning. You must route high-gauge solar cables from a moving platform down into the stationary MPV body. Poor routing causes wires to pinch in the scissor hinges. Pinched wires create fire hazards. Installers must use waterproof deck glands. They create a deliberate slack loop. This loop allows the cables to extend safely when elevating the camper.
Understanding the pricing model prevents budget blowouts. You must separate base costs from "on-the-road" costs. Vendors often advertise a tempting base price. This price rarely includes essential upgrades. You will likely pay extra for color-matching the fiberglass. Scenic canvas options cost more. Upgraded memory foam mattresses add to the bill. Roof rack preparations incur further charges.
Labor typically consumes 40 to 50 percent of the final invoice. Cutting metal is labor-intensive. Installers spend hours treating raw cut edges. Rust-proofing is mandatory. They must bolt in the strengthening frame perfectly. Interior trimming takes immense patience. The labor reflects the skill required to maintain structural integrity.
Let us look at common installation tasks driving up labor hours:
Precision cutting of the original factory steel ribs.
Applying anti-corrosion treatments to exposed metal edges.
Riveting and bonding the TÜV-approved reinforcement frame.
Wiring interior LED lighting and solar cable routing.
Trimming the interior headliner for a seamless factory finish.
A professional installation impacts your return on investment (ROI). Official certification increases the resale value of your MPV. Buyers pay a premium for verified structural safety. Conversely, a poorly executed DIY job depreciates the base vehicle. Untidy cuts and water leaks destroy the van's market value. Professional labor acts as a protective investment for your asset.
Choosing the right installer dictates the success of your build. You must vet vendors ruthlessly. Do not rely solely on social media pictures. Dig into their compliance history.
Always ask vendors for proof of reinforcement frame certifications. Ensure they use genuine, crash-tested frames. Question their specific experience regarding your exact MPV chassis. An installer fluent in VW Transporters might struggle on a Mercedes Vito. Chassis differences matter immensely.
Use the following checklist when interviewing an installation partner:
Request physical proof of M1 or TÜV crash test certificates.
Confirm they treat all cut metal edges for rust prevention.
Ask how many conversions they have completed on your specific van model.
Verify their exact water-testing protocol before vehicle handover.
Request a detailed breakdown separating parts from labor costs.
You must clearly separate warranty scopes. The manufacturer warrants the fiberglass shell, canvas, and gas struts. The installer warrants the labor. They cover water ingress, sealant failure, and structural squeaks. Get both warranties in writing. Clarify who takes responsibility if the canvas leaks near the bonding line.
Inquire about lead times and testing protocols. Quality installers book months in advance. Rushed jobs lead to trapped canvas and degraded sealants. Ask buyers about the water-testing protocol. The installer should aggressively hose down the closed shell. They must ensure airtight and watertight seals before handing over the keys.
An MPV pop-top transforms a cramped daily driver into a highly functional camper. However, this transformation succeeds only if you respect physical limits. You must balance the payload penalty against usable space. You must plan solar upgrades around strut capacities. Above all, you must prioritize structural safety over aesthetic upgrades.
Choosing the right certified installer matters just as much as choosing the right brand. Professional labor prevents catastrophic leaks and dangerous structural weaknesses. It protects your financial investment.
Take action today. Download a conversion checklist. Request a detailed quote from a certified installation partner. Schedule a consultation to review your specific MPV layout and start your build safely.
A: While DIY kits exist, it is highly discouraged due to the structural cutting required, the risk of irreversible water leaks, and the potential voiding of vehicle insurance without professional safety certifications.
A: Most MPV pop-tops can safely support between 100W and 300W of solar, provided the gas lifting struts are upgraded to handle the additional 20–40 lbs of dynamic weight.
A: Yes, the marine-grade canvas provides minimal thermal retention compared to insulated metal walls. However, thermal wraps (external or internal) and diesel heaters can effectively mitigate heat loss for four-season camping.
A: Quality roofs featuring properly treated canvas and marine-grade rubber seals will not leak if properly maintained. Leaks usually stem from poorly executed DIY installations, trapped canvas in the closing mechanism, or degraded sealants.


